SpringBoot 원리 7)조건부 자동구성
이전까지 자동구성 : 컨스트록춰 빈 기술 종류별로 클래스를 만들고, 외부 파일 목록에서 읽어와서 사용할 수 있도록
–> But! Spring Boot에 들어있는 Configuration 종류에는 어떤게 있을까?
org.springframework.boot.autoconfigure.admin.SpringApplicationAdminJmxAutoConfiguration
org.springframework.boot.autoconfigure.aop.AopAutoConfiguration
org.springframework.boot.autoconfigure.amqp.RabbitAutoConfiguration
org.springframework.boot.autoconfigure.batch.BatchAutoConfiguration
									:
									:
org.springframework.boot.autoconfigure.websocket.reactive.WebSocketReactiveAutoConfiguration
org.springframework.boot.autoconfigure.websocket.servlet.WebSocketServletAutoConfiguration
org.springframework.boot.autoconfigure.websocket.servlet.WebSocketMessagingAutoConfiguration
org.springframework.boot.autoconfigure.webservices.WebServicesAutoConfiguration
org.springframework.boot.autoconfigure.webservices.client.WebServiceTemplateAutoConfiguration

=> 144개
=> SpringBoot (Opinionated) : 선택할 수 있는거 제외하고, 스프링 부트를 사용하려면 자동적으로 적용하려는 애들을 자동구성정보 목록으로 작성
지금까지 방식이면 Configuration 클래스들 + 그 안에 빈들 까지 몇백개의 빈을 다 생성하는 방식 (실제론 몇가지 안되는데… 말도 안됨)
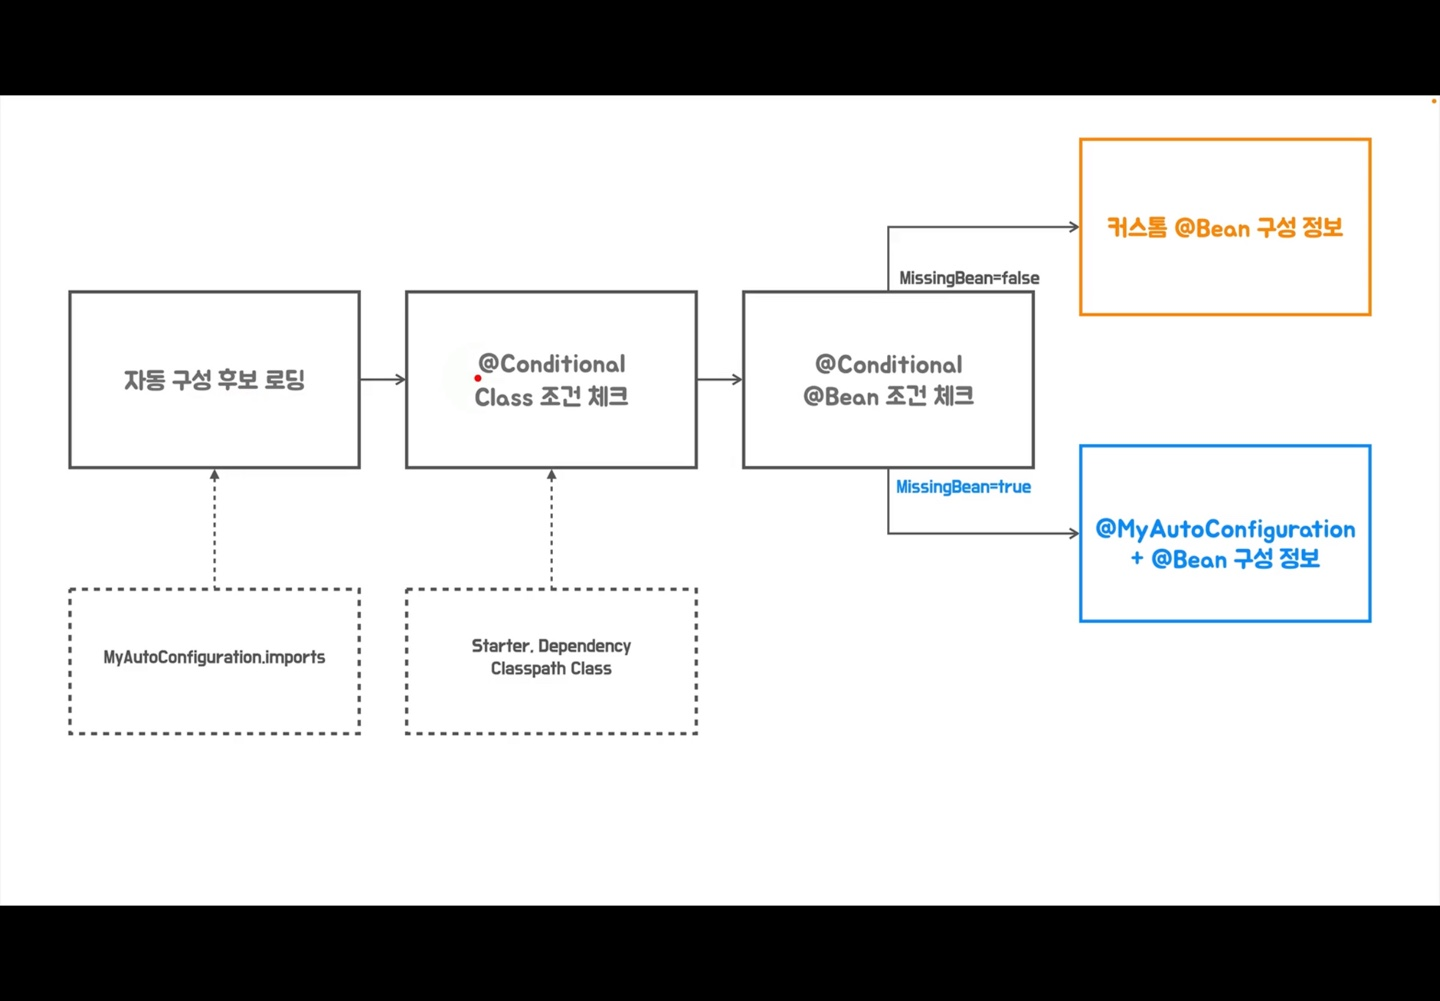
- => 각각의 Configuration 클래스 + 빈 팩토리 메서드들 => 여기에 각각 조건을 걸어 이걸 적용할까? 말까?를 결정해 포함여부 결정
-
즉 , 일반 파일에 적힌 클래스 목록들은 실제 다 생성되는 빈 목록이 아닌 후보들, 그렇다면 어떤 조건으로 이중 사용할 애들을 결정?
=> 이게 어떻게 일어남? ?
[실습 : 어떤 조건을 걸어 Webserver로 Tomcat을 쓸지, Jetty를 쓸지 선택해보자]
1. Jetty 자동구성 목록에 추가
- Tomcat Library : spring initializer가 포함시킴
# build.gradle

dependencies {
	implementation 'org.springframework.boot:spring-boot-starter-web'
	testImplementation 'org.springframework.boot:spring-boot-starter-test'
}
spring-boot-starter-web 이 라이브러리 하나 작동시키는데 어떻게 모든게 동작할까?
=> 이 라이브러리는 굉장히 많은 라이브러리 모듈을 포함하기 때문 (그래들의 트리구조 라이브러리 참고)
=> 스프링이 스프링 버전에 맞춰 라이브러리 버전도 다 맞춰서 넣어줌
(jsp에선 일일히 다운받아 추가시켜줌……..+ 맨땅에서 하나하나 조사해서 호환되는 라이브러리들의 버전까지 맞춰줌 )
ㄴ spring-boot-starter-tomcat <=> tomcat은 스프링 프로젝트 만들면 자동으로 추가해줌
=> But ! Jetty는 따로 추가해줘야함 !
**1. 의존 추가 **
dependencies {
	implementation 'org.springframework.boot:spring-boot-starter-web'
	implementation 'org.springframework.boot:spring-boot-starter-jetty'
	testImplementation 'org.springframework.boot:spring-boot-starter-test'
}
2. Jetty 와 관련된 ServierConfig 추가 : JettyWebServerConfig
=> 어떤 조건이 만족되면 Jetty를 , 어떤 조건에선 Tomcat을 자동으로 선택하도록 만드는게 목표 !
@MyAutoConfiguration
public class JettyWebServerConfig {
    @Bean("jettyWebServerFactory")
    public ServletWebServerFactory serverFactory (){ // 얜 수정 안해도 됨 (interface형 참조변수의 이유)
        return new JettyServletWebServerFactory(8081);
    }
}
tobyspring.config.autoConfig.DispatcherServletConfig
tobyspring.config.autoConfig.TomcatWebServerConfig
tobyspring.config.autoConfig.JettyWebServerConfig
3. 각 Bean 이름 지정
-
원래 spring framework에선 xml에서 생성된 bean이름 지정해줬어야함
=> boot에선 자동으로 factory 메서드 이름 따라감
=> 수동 지정 가능 : @Bean(“jettyWebServerFactory”)
(tomcat도 같이 생성되면 같은 factory메서드다보니 이름 충돌되므로 )
=> 이 상태로 서버 띄우면 에러 : 서블릿 컨테이너가 2개 등록되었다
Unable to start ServletWebServerApplicationContext due to multiple ServletWebServerFactory beans : tomcatWebServerFactory,jettyWebServerFactory
- ㄴ 어떻게 둘 중 하나를 선택해서 이 애플리케이션의 서블릿 컨테이너로 사용되도록 할 수 있을까?
-
@Conditional
2. @Conditional 적용
@MyAutoConfiguration
@Conditional(JettyWebServerConfig.JettyCondition.class)
public class JettyWebServerConfig {
    @Bean("jettyWebServerFactory")
    public ServletWebServerFactory serverFactory (){ // 얜 수정 안해도 됨 (interface형 참조변수의 이유)
        return new JettyServletWebServerFactory(8081);
    }

    static class JettyCondition implements Condition {
        @Override
        public boolean matches(ConditionContext context, AnnotatedTypeMetadata metadata) {
            // ConditionContext : 현재 스프링 컨테이너 환경에 대한 정보를 얻을 수 잇는 클래스
            // + AnnotatedTypeMetadata : Meta 애노테이션으로 사용하고 있는 애노테이션들에 대한 metadata 반환
            // return false; // bean으로 등록할건지, 무시할건지 boolean 으로 반환
            return true;
        } // matches
    } // JettyCondition
} // JettyWebServerConfig
- TroubleShooting : Jetty 쪽을 true로 지정해줬음에도 ServerFactory로 찾지 못하는 문제
- 해결
- 톰캣쪽을 true로 바꿔 실행 => 정상적으로 동작 : 코드는 틀리지 않았으나 Jetty 빈 생성에 문제가 있음을 발견
- 의존 목록 확인 => gradle 목록에 추가했음에도 의존목록에 없음 (오타 확인했는데 틀리지 않음)
- 원인 : Intellij 오류 - 의존 목록 반영 x
- 구글링 keyword : gradle jetty 의존 추가 안됨
- 해결 : file - invalidates caches - 프로젝트 rebuild (jdk 재가동) => 의존 잘 반영 ~
참고 : gradle 에 추가한 의존성을 IntelliJ 에서 못 찾을 때 (lesstif.com)
=> Load 다시해야함 ??
- class level 말고 method 레벨 (@bean) 에도 @conditional 할 수 있음
=> 빈 메서드에 붙은 conditional 조건이 true인 경우에만 해당 빈 등록 / 아님 무시 (클래스는 전체 빈 메서드의 생성 여부를 판단)
class level true -> method level true 여야 빈으로 등록됨
- testcode 작성
- troubleShooting : static keyword를 잘 붙이자…
- MetaAnnotation : trueConditional 생성
3. @Conditional 의 Value : ClassUtils.isPresent
-
실제로 자동구성정보 true, fale 를 저런식으로 일일히 지정하지 않음
=> Spring boot : 해당 라이브러리의 존재 유무를 보고, 그 라이브러리가 있으면 조건구성의 true 값을 주고 그 서블릿을 띄우고, 없으면 안띄움 (즉 , 조건 형식 : 라이브러리 존재 유무)
=> 라이브러리 존재 유무 : 특정 클래스 존재유뮤 검사 (Tomcat -> Tomcat.class , Jetty -> Server.class )
=> 이 클래스 검사 어떻게 ? Spring 이 제공하는 Utility class 활용 : ClassUtils
static class TomcatCondition implements Condition { @Override public boolean matches(ConditionContext context, AnnotatedTypeMetadata metadata) { // return false; return ClassUtils.isPresent("org.apache.catalina.startup.Tomcat", context.getClassLoader()) ; } // matches } // TomcatCondition -
Conditional에 직접 Condition 클래스를 추가하는 것이 아닌 커스텀 메타 애노테이션을 추가해서 그 안에 조건에 해당하는 값을 넣어주고 그걸 Condition에서 읽어와 사용 (Test Code에서 사용한거랑 같음)
// 클래스 이름을 읽어와서 해당 클래스가 존재하는지 유무를 boolean 값으로 반환하면 그 boolean *값으로 해당 클래스 빈 객체 생성 여부 결정
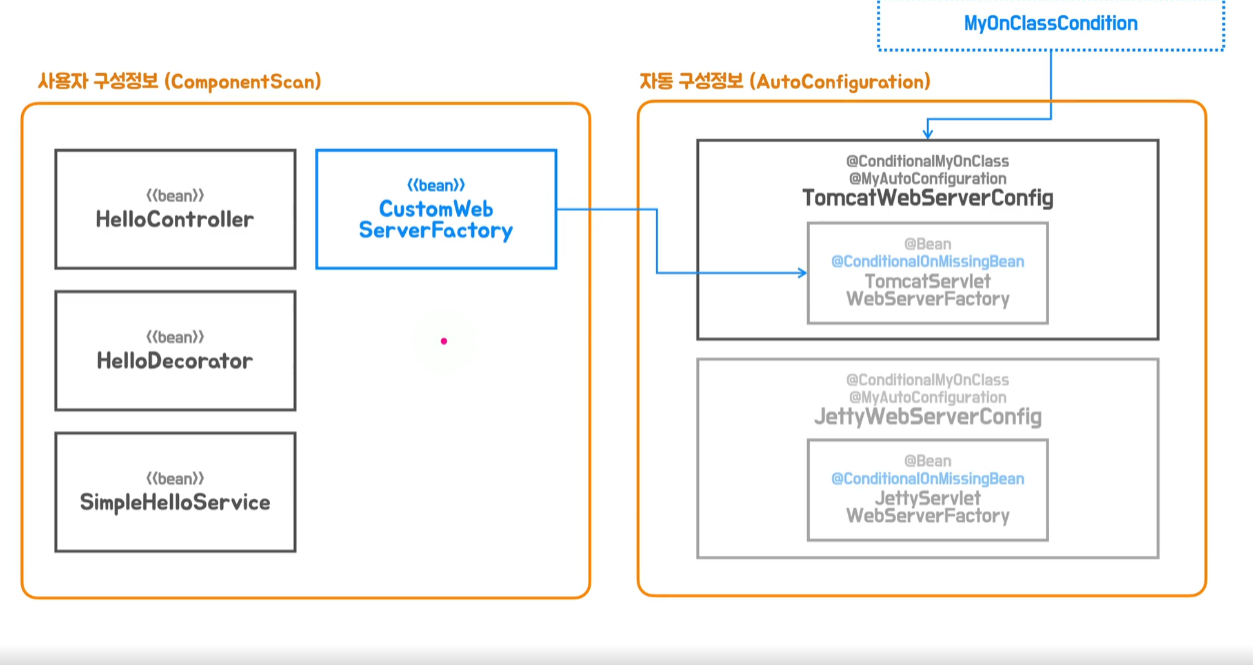
4. 자동 구성정보 대체하기 (커스톰 @Bean) : @ConditionaOnMissingBean
- 포함되는 자동 구성 정보 (Object)를 무시하고 내가 만든 custom configuration을 사용하게 해줘 (스프링 부트 개발시 이런경우 반드시 발생)
=> 사용자 구성정보에다가 자동 구성정보와 등록되는것과 같은 인프라 빈을 직접 작성하면, 그 전의 후보였던 인프라 빈들 대신 내거가 사용되도록 만들어줄 수 있음 (overide와 비슷)
: @Conditional & Condition.class 이용
1. ComponentScan 대상 (유저빈)으로 톰캣 추가
package tobyspring.helloboot;

import org.springframework.boot.web.embedded.tomcat.TomcatServletWebServerFactory;
import org.springframework.boot.web.servlet.server.ServletWebServerFactory;
import org.springframework.context.annotation.Bean;
import org.springframework.context.annotation.Configuration;
import tobyspring.config.autoConfig.TomcatWebServerConfig;

@Configuration(proxyBeanMethods = false) // 얜 Component Scan에 의해 추가
public class WebServerConfiguration {

    @Bean
    ServletWebServerFactory custormerWebServerFactory(){
        TomcatServletWebServerFactory serverFactory = new TomcatServletWebServerFactory() ;
        serverFactory.setPort(9090);
        return serverFactory ;
    }
}
=> 에러 : 자동구성에서 톰캣있는데 여기서 또 못띄웡,,!
=> 따로 다시 지정해야함
2. method level Conditional
=> 클래스 레벨은 그대로 둠 <-> 일단 TomcatWebServerConfig 얜 생성이됨
=> TomcatServlet에 @ConditionaOnMissingBean 을 넣어서 만약 같은 유저정보 빈이 있으면 유저정보빈으로 사용
ㄴ 이걸 위해서 DeferredImportSelector 를 implement
 @MyAutoConfiguration
 @Conditional(JettyWebServerConfig.JettyCondition.class)
 public class JettyWebServerConfig {
     @Bean("jettyWebServerFactory")
     @ConditionalOnMissingBean
     public ServletWebServerFactory servletWebServerFactory(){ // 얜 수정 안해도 됨 (interface형 참조변수의 이유)
         return new JettyServletWebServerFactory(8081);
     }
 }
-
이렇게 잘못 유저정보 빈 잘못 집어넣으면 자동구성정보 대체하면서 앱 실행 문제 발생 !
=> 그럼 어케 ? 이걸 쓰면, Spring Boot 의 내부적인 인프라 빈 어떤걸 대체하고 기능이 어떻게 달라지는지 잘 확인해야함
* Conditional 확장 애노테이션
- Spring Boot 가 제공하는 자동구성정보를 알고있어야하는 경우 有 : 사용 or 대체
- 제 3의 기술을 사용하기 위해 자동구성정보로 등록해서 사용하려면 알아야함 !
@Profile
Class Conditions - @ConditionakOnClass ** , @ConditionalOnMissingClass For 조건부 자동 구성
=> 주의 : 메서드에도 사용되지만 그럼 불필요하게 클래스 빈이 생성되므로 클래스 먼저 고려해야함
Bean Conditions - @ConditionalOnBean , @ConditionalOnMissigBean ** For 자동구성정보 대체
=> 주의 : 처리 순서 중요 (유저 구성정보먼저 진행되므로 ㄱㅊ But 자동구성 여러개가 여러개고 , factory Method가 여러개인경우 이걸 걸때 순서를 고려해야함 -> 우선 순위 정해서 작성해야 뒤에 검사 안했는데…! 문제 방지 )
Property Conditions - @ConditionalOnProperty => 환경 프로퍼지 정보 중 지정된 프로퍼티 값이 있는지
ex) 라이브러리를 다 로드해도 됨 근데 난 property 파일에 서블릿 톰캣 쓸지, 재키 쓸지 결정할래 => 이런 경우 이거 사용
Resource Conditions - @ConditionalOnResource -> 지정된 리소스(파일)의 존재를 확인
Web Application Conditions - @ConditionalOnWebApplication, @ConditionalOnNotWebApplication
=> 웹 애플리케이션 여부를 확인. 모든 스프링 부트 프로젝트가 웹 기술을 사용해야하는 것은 아님
SpEL Expression Conditions
@ConditionalOnExpression 은 동적으로 설정정보를 문자열 형태로 만들어내는 스프링 표현식(언어)의 처리결과를 기준으로 판단(매우 상세한 조건 설정 가능)
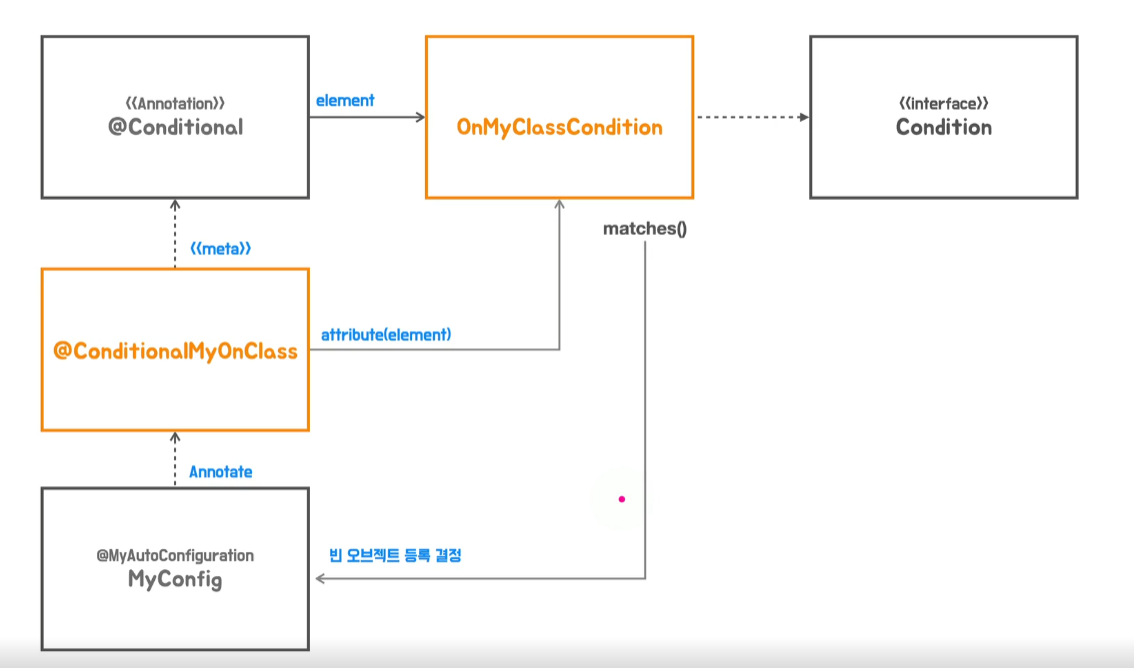
5. 분리 : @ConditionalMyOnClass & MyOnClassCondition.class
TomcalServletConfig와 JettyWebServerConfig의 matches는 완전 중복코딩
=> 하나의 @Conditional 어노테이션과 Condition.java로 뺀 어노테이션을 만들어 집어넣어줌
@MyAutoConfiguration
// @Conditional(JettyWebServerConfig.JettyCondition.class)
@ConditionalMyOnClass("org.eclipse.jetty.server.Server")
public class JettyWebServerConfig {
    @Bean("jettyWebServerFactory")
    @ConditionalOnMissingBean
    public ServletWebServerFactory servletWebServerFactory(){ // 얜 수정 안해도 됨 (interface형 참조변수의 이유)
        return new JettyServletWebServerFactory(8081);
    }
}
@Retention(RetentionPolicy.RUNTIME)
@Target({ElementType.TYPE,ElementType.ANNOTATION_TYPE})
@Conditional(MyOnClassCondition.class)
public @interface ConditionalMyOnClass {
    String value();
}
// 클래스 이름을 읽어와서 해당 클래스가 존재하는지 유무를 boolean 값으로 반환하면 그 boolean 값으로 해당 클래스 빈 객체 생성 여부 결정
public class MyOnClassCondition implements Condition {
    @Override
    public boolean matches(ConditionContext context, AnnotatedTypeMetadata metadata) {
        Map<String,Object> attrs =  metadata.getAnnotationAttributes(ConditionalMyOnClass.class.getName()) ;  // 이 애노테이션에 붙은 모든 attribute를 map 형태로 반환
        String value = (String)attrs.get("value") ;

        return ClassUtils.isPresent(value,context.getClassLoader()) ;

    }
}
- Starter, Dependency 로 등록해두면, 해당 어플리케이션의? Classpath로 등록이됨 !
Properties : 외부 설정을 이용한 자동구성
빈 오브젝트를 아예 다른걸 등록하는게 아니라 자동등록 빈의 내용을 세부적으로 수정
ex) jdbc 비밀번호는 어디 ?
- => 외부 설정은 자동 구성 중 어떤 타이밍에 왜 필요한가?
-
물론 이전엔 유저구성정보 작성으로 했지만… 그 기술이 굉장히 복잡할 경우 아예 그 빈을 새로 구현하는건 너무 힘드니,
만들어져 적용되는 자동 구성정보의 정보를 약간 바꾸는 방식이 더 효율적임 !
=> 앞선 과정에 한 가지 더 있음

-
외부 설정정보를 이용해 생성된 빈 오브젝트의 property 값을 ‘수정’하는 것 (자동구성정보는 디폴트로 되어있는데, 이걸 필요한 경우 바꿔줘야할 때 있음 )
ex) 톰캣 포트번호 변경
ㄴ 자동구성정보의 다양한 프로퍼티를 바꿀수 잇는 방법 => Environment Properties !
[Environment Abstraction? ]
코드를 매번 직접 수정하지 않고도 어플리케이션의 구성을 수정할 수 있도록 해줌 ==> 외부 설정을 통한 Property!
-
@Profile 모델 : 특정 조건을 만족한 profile일때만 어떤 빈들을 사용할 것인
-
Property값 읽어오기
외부에 Property 값을 설정해두고, 애플리케이션이 실행될 때 해당 값을 읽어오도록 동작 ex) DB 을 연결할 때 username
=> 자바, 서블릿에선 다양한 방법으로 해당 Property 값에 접근,
But! Spring 은 Environment라는 이름으로 단일화된 방식으로 access할 수 있도록 추상화 (“서비스 추상화”)
추상화 종류에 따른 5가지 프로퍼티
-
StandardEnvironment => 주로 o ! 미리 지정해줄 일 있으면 여기서 지정
- System Properties : 자바에서 기본적으로 다루는 프퍼티
- System Environment : OS 자체에 환경 변수를 세팅하고 읽어오도록
-
StandardServletEnvironment (서블릿 사용시 활용가능한 프로퍼티 설정) => 거의 x : boot에선 서블릿 직접 안다뤄주니까 !
- ServletConfig Parameter : xml 같이 서블릿을 초기화하는 코드에 서블릿 파라미터 지정
- ServletContext Parameter : “ “ => But Servlet Context level 에 지정
- (JNDI)
+) Spring Boot은 추가적으로 이러한 Environment의 프로퍼티를 읽어온다
- @PropertSource : 애노테이션을 붙여 커스텀으로 프로퍼티를 추가하는 방식도 제공함 !
- application.properties, xml, yml : 이런 타입의 프로퍼티 정보를 이 Environment 추상화를 통해 읽어옴
- => Environment 타입으로 가져오면 , getProperty로 값 가져옴 (우선순위가 있음)
-
Environment.getProperty(“property.name”) (–> property.name, property_name, PROPERTY.NAME, PROPERTY_NAME : 이 이름들의 프로퍼티 있는 지 확인
EX) ApplicationRunner Bean
- 어플리케이션을 실행할 때 특정 기능이 실행되도록 바꾸겠음 !
-
main에 코드를 추가해도 되지만 그것보단 스프링 부트가 제공하는 ApplicationRunner Interface 사용 !
=> ApplicationRunner : 컨테이너 초기화 작업이 끝난 후 실행될때 빈으로 실행되는 클래스
@Bean
ApplicationRunner applicationRunner(Environment env){
// 스프링 안에 있는 환경정보를 추상해놓은 Object인 Environment를 주입받음(실행될때 자동으로 )
return args ->{
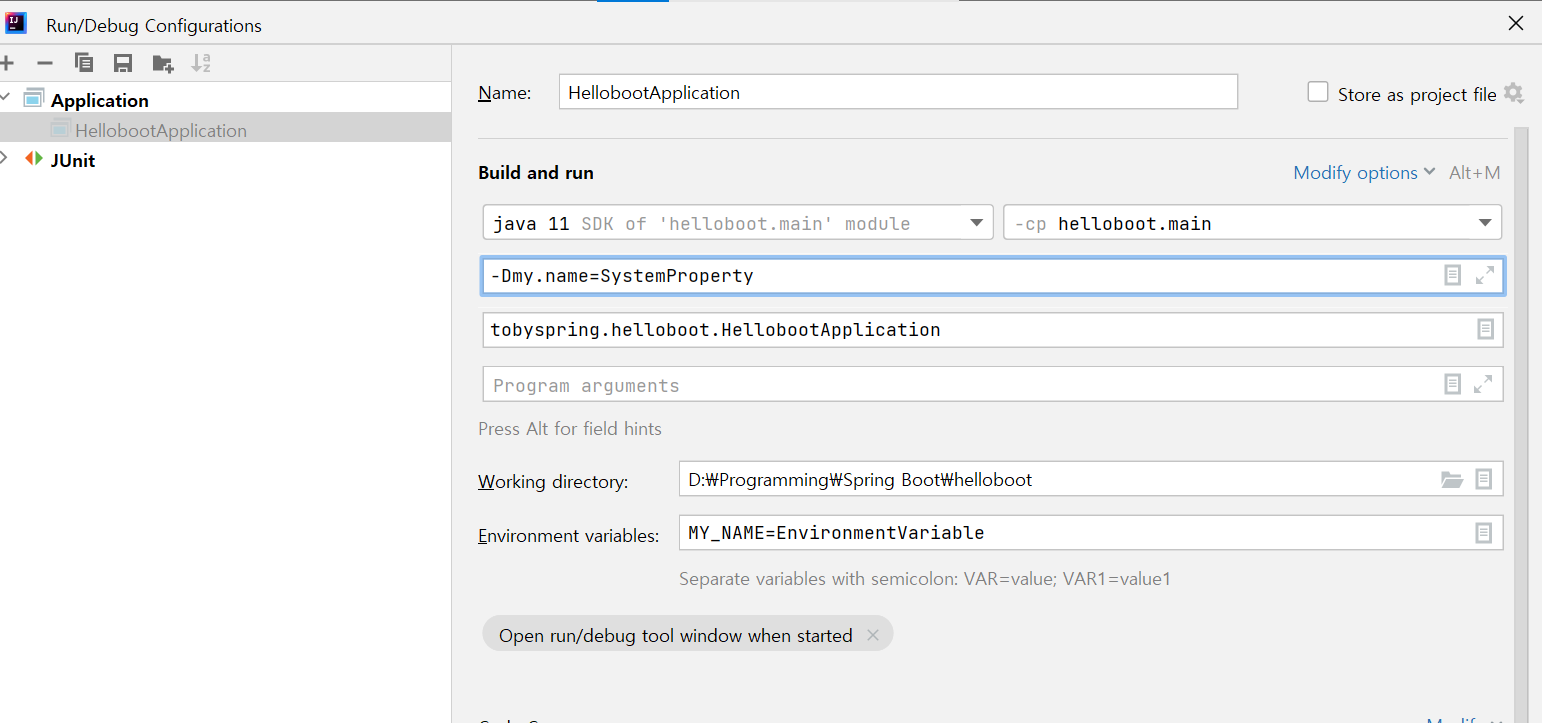
String name = env.getProperty("my.name");
System.out.println("my.name:" + name);
// my.name:null --> my.name:ApplicationProperties --> my.name:EnvironmentVariable (System Environment ) --> my.name:SystemProperty
} ;
}
ㄴ Environment는 스프링이 자체적으로 빈으로 등록해 사용하는 클래스 => 이걸 자동 DI로 주입받아서 사용 가능
-
환경변수 설정시 이 Properties 파일보다 우선해서 적용
- System Environment
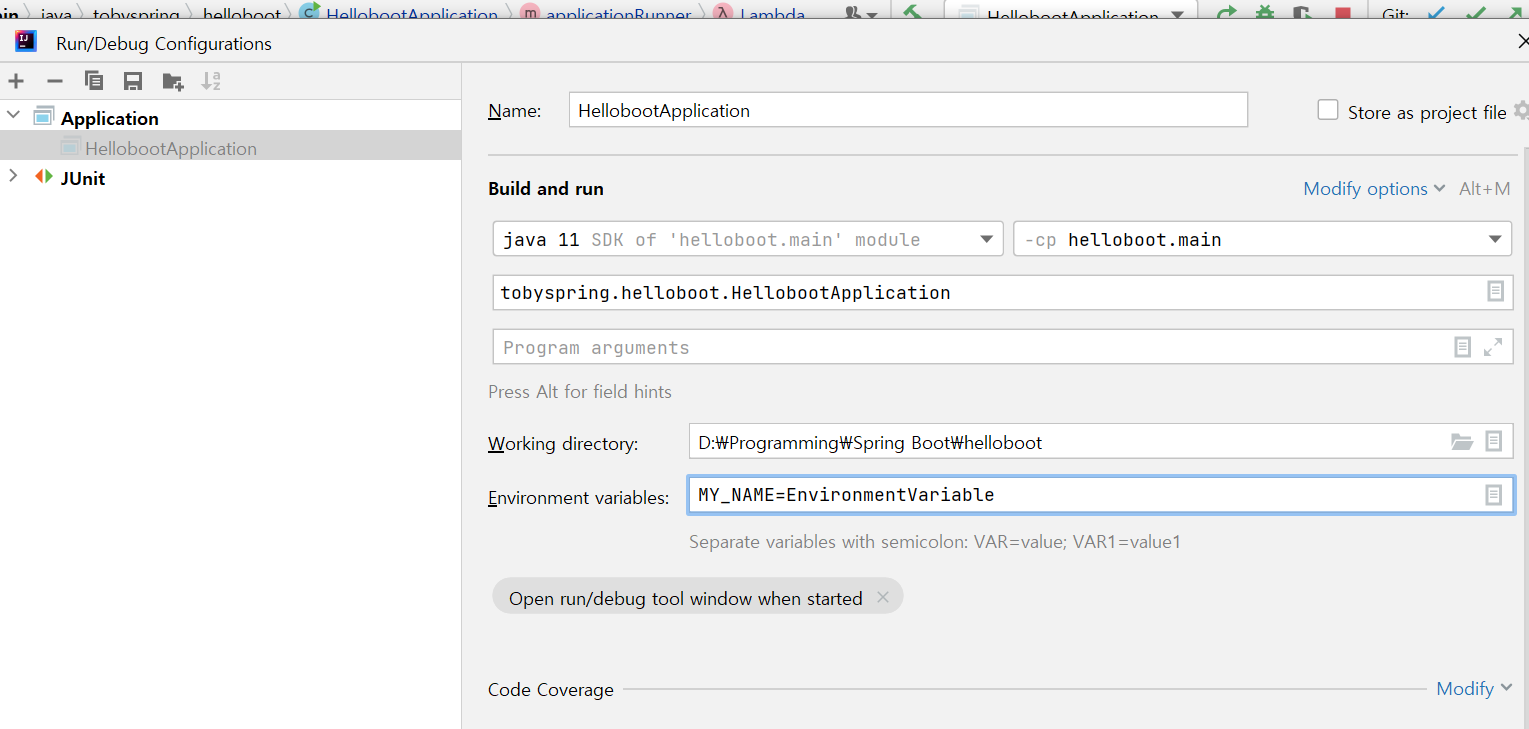
*환경변수 이름은 보통 대문자 + 언더바
-
System Properties
-
properties 파일 변경
#configuring port
my.name = ApplicationProperties

server.port = 8081
# 헐 난 이미 해봄!! 포트번호 바꿀때 이 파일에 작성해 초기 실행할때 embedded Tomcat이 포트번호 8081하도록 설정함 헐 !!
[실습: 자동구성 톰캣의 포트번호, contextPath를 수정해보자]
- property는 (key,value) 의 형태로 저장된다 –> 그래서 Map<> 으로 받는 경우가 많았음
1. Enviroment.getProperty(저장된 properties 파일 설정값)
- helloboot 패키지(ComponentScan)의 커스텀 빈 제거 (톰캣 유저정보 제거 )
- application.properties 파일에 contextPath 속성 지정
#configuring port
server.port = 8081
my.name = ApplicationProperties
contextPath=/app
- Envioronment를 활용해 해당 속성 읽어와 Tomcat contextPath로 지정해주기 !
@MyAutoConfiguration
@ConditionalMyOnClass("org.apache.catalina.startup.Tomcat")
public class TomcatWebServerConfig {

    @Bean("tomcatWebServerFactory")
    @ConditionalOnMissingBean
    public ServletWebServerFactory servletWebServerFactory(Environment env){
        TomcatServletWebServerFactory factory =  new TomcatServletWebServerFactory(8081);
        // factory.setContextPath("/app");
        // 이걸 정해주면 모든 서블릿의 Mapping앞에 contextPath 추가 => 그냥 /hello 면 에러 ! /app/hello 로 요청 보내줘야함
        // 이걸 코드로 박아넣지 않고 Enviomnet를 통해 Property 값 지정
        factory.setContextPath(env.getProperty("contextPath"));
        return factory ;
    }
}
- 개선 : 필드에 주입 => placeholder 사용
Environment 에서 직접 값을 읽어올 수 있지만, Spring 에선 Property에서 읽어온 값을 필드에 주입해주는 방법도 있음
=> 매번 읽어오기보다 필드로 선언해두면 재사용 용이 (getProperty 코드 생략)
=> placeholder: @Value(“${contextPath}”)
package tobyspring.config.autoConfig;


@MyAutoConfiguration
@ConditionalMyOnClass("org.apache.catalina.startup.Tomcat")
public class TomcatWebServerConfig {

    @Value("${contextPath:}")
    String contextPath;

    @Value("${port:8081}")
    int port; // 만약 이 값을 지정하지 않으면(properties에 안쓰면) 띄우면 에러 => default값을 지정해줘야함 ':8081'

    @Bean("tomcatWebServerFactory") // factory 메서드 실행 -> 얘네도 생성
    @ConditionalOnMissingBean
    public ServletWebServerFactory servletWebServerFactory( /*Environment env */ ServerProperties properties){
        TomcatServletWebServerFactory factory =  new TomcatServletWebServerFactory(8081);

        // factory.setContextPath(env.getProperty("contextPath"));
        factory.setContextPath(this.contextPath);

        return factory ;
    }
}
=> 에러 ! 문자열 그대로 추가됨 : 이 치환 기능은 스프링의 기본기능이 아니기 때문에 후처리 기능으로 추가해줘야함 *=>
=> PropertyPlaceholderConfig.java 추가 !
ㄴ Bean : PropertySourcesPlaceholderConfigurer 를 등록시켜주는 Config.java
: Environment로 추상화된 각종 PropertySource로 부터 ${} (placeholder) 에서 적어준 값을 지정해준 도구
=> 자동구성으로 지정 : 클래스 목록에 추가
tobyspring.config.autoConfig.PropertyPlaceholderConfig
=> 치환자 적용 ㄱㄴ !
2. ServerProperties: 프로퍼티를 담고있는 정보를 독립적인 클래스
- 근데 프로퍼티가 굉장이 많다면,,,,? 필드 몇백개 쓸거야? 조금 더 구조적으로 다룰 순 없을까?
=> 프로퍼티를 담고있는 정보를 독립적인 클래스로 추출, 분리 : ServerProperties.java –> autoConfig
–> 해당 클래스로 객체를 생성해 여러값을 세팅한 후 Bean으로 등록하기위한 클래스 : ServerPropertiesConfig.java
–> 톰캣Config는 그 세팅된 객체를 주입받음: 톰캣 자체의 필드로 정의하는게 아닌 Property 객체에 저장된 값을 읽어옴
Tomcat(ServerProperties) => 그 클래스 주입받음
- ServerProperties.java 로 프로퍼티 목록 정의
@MyConfigurationProperties(prefix="server") // 이 아래 property들에 대한 namespace 역할 (파키지 같은 역할)
public class ServerProperties {

    String contextPath;
    int port;

    public String getContextPath() {
        return contextPath;
    }
    public int getPort() {
        return port;
    }
    public void setContextPath(String contextPath) {
        this.contextPath = contextPath;
    }
    public void setPort(int port) {
        this.port = port;
    }
}
- 해당 클래스 값 세팅해주는 클래스 ServerPropertiesConfig 생성
- 원리 : 스프링부트는 어떤 프로퍼티값읽어 사용할땐 프로퍼티값들을 정의해둔 클래스가 있고, 이걸 자동구성 빈에서 주입받아 사용하니, 이 프로퍼티값들을 정의해둔 클래스를 빈으로 등록해주는 작업이 필요
@MyAutoConfiguration
public class ServerPropertiesConfig {
    @Bean
    public ServerProperties serverProperties(Environment env){
        ServerProperties properties = new ServerProperties();

        properties.setContextPath(env.getProperty("contextPath"));
        properties.setPort(Integer.parseInt(env.getProperty("port")));

        return properties;
    }
}
- =>근데, 이렇게 Environment에서 일일히 꺼내오는 과정 불편! 개선해보자 ~
-
Binder.java
@MyAutoConfiguration
public class ServerPropertiesConfig {
    @Bean
    public ServerProperties serverProperties(Environment env){

        return  Binder.get(env)   // Environment로부터 Property값들을 가져와서
            .bind("", ServerProperties.class).get(); // ServerProperties 필드들과 Binding해서 값 넣어줌
        // * Binding 이렇게 하면 Properties 클래스에 있는 필드 이름과 일치하는 property 값들을 자동으로 넣어줌
        //
    }
}
=> 이러면 프로퍼티 파일과 Properties 클래스만 맞춰 수정해주면, 이 Config 파일은 수정해줄 필요 없음
(Tip: 어떤 propery 값을 수정, 다룰땐 ServerPropertis.java 확인해서 목록 확인할 수있음 )
(+prefix)
- 톰캣Config은 그 Property 값으로 세팅된 객체 주입받음
@MyAutoConfiguration
@ConditionalMyOnClass("org.apache.catalina.startup.Tomcat")
@Import(ServerProperties.class)
public class TomcatWebServerConfig {
/*
    @Value("${contextPath:}")
    String contextPath;

    @Value("${port:8081}")
    int port;
*/
    @Bean("tomcatWebServerFactory")
    @ConditionalOnMissingBean
    public ServletWebServerFactory servletWebServerFactory( /*Environment env */ ServerProperties properties){
        TomcatServletWebServerFactory factory =  new TomcatServletWebServerFactory(8081);

        factory.setContextPath(/*this.contextPath*/ properties.getContextPath());
        factory.setPort(/*port*/ properties.getPort());

        return factory ;
    }
}
=> 톰캣 자체의 필드로 정의하는게 아닌 Property 객체에 저장된 값을 읽어옴
3. ServerPropertiesConfig 없이 빈 객체 생성
위의 방식 : Config가 객체를 생성하고, 값 설정해서, 빈으로 등록 (객체생성 –> 값 세팅 –> 빈 등록 –> 빈 주입)
=> 문제
-
사용하는 기술이 늘어날때마다 이렇게 Properties 클래스가 늘어날거고, 그에 맞춰 Config도 계속 생성해주면서 늘어날거임
-
해당 자동구성 사용할경우에만 활성화해야하기 때문에 또 각 Config 파일에도 Conditional 만들어서 빈 생성할지 조건줘야함 (톰캣이야? 제티야? )
- => ServerProperties 를 세팅+ 빈 등록하는 방식 바꿔야함 !
-
클래스 자체에 표식을 줘 컨테이너가 빈으로 등록하고, 그 값을 설정해야함 (객체 생성 – 빈 등록 –> 빈 주입 –> 값 세팅)
- ServerPropertiesConfig 제거 (파일에서도 제거해야함)
- @Component : ServerProperties 클래스 자체를 빈 후보로 등록 !
(VS 위에 : ServerProperties 객체를 생성해서, 그 값을 세팅한 객체 자체를 빈으로 등록 )
@Component
public class ServerProperties {
    String contextPath;
    int port;

    public String getContextPath() {
        return contextPath;
    }

    public int getPort() {
        return port;
    }

    public void setContextPath(String contextPath) {
        this.contextPath = contextPath;
    }

    public void setPort(int port) {
        this.port = port;
    }
}
- @Import(ServerProperties .class)
=> 그럼 ServerProperties 어떻게 빈으로 등록해? @Import하면 빈으로 등록됨
(@Import : @ComponentScan 대체 가능! )
4. BeanPostProcessor : 생성된 빈 값 설정
그래도 에러 ! contextPath, port값 지정 안해줬으니까
<-> 빈으로 생성 한후, Properties 파일에서 읽어온 값으로 값 설정해줘야함 (객체 생성 – 빈 등록 –> 빈 주입 –> 값 세팅)
(이전 : Config가 객체를 생성하고, 값 설정해서, 빈으로 등록)
- => 이거 어떻게지정? 빈의 후처리기
-
빈을 다 만들고 주입한 다음에 , 그 빈을 가공할 수 있는 기회가 주어지는 것
- @ MyConfigurationProperties 제작
@Retention(RetentionPolicy.RUNTIME)
@Target(ElementType.TYPE)
@Component
public @interface MyConfigurationProperties {

}
=> 이 애노테이션이 붙은 클래스는 빈으로 등록된 후 값을 설정가능
- 후처리 할 클래스에 만든 애노테이션 붙이기
@MyConfigurationProperties
public class ServerProperties {

    String contextPath;
    int port;

    public String getContextPath() {
        return contextPath;
    }

    public int getPort() {
        return port;
    }

    public void setContextPath(String contextPath) {
        this.contextPath = contextPath;
    }

    public void setPort(int port) {
        this.port = port;
    }
}
- 후처리기 PropertyPostProcessorConfig.java 생성
: 빈으로 등록한 클래스에 MyConfigurationProperties 애노테이션이 붙어있는 경우엔
, 해당 빈(ServerProperties)의 클래스를 가져와
, Environment의 Property 값을 바인딩하거나, 해당 프로퍼티 목록으로 클래스를 새로 만들어 값을 세팅해 반환하고
, 빈으로 다시 등록한다 (ServerProperties)
@MyAutoConfiguration // 자동 구성정보로 빈 생성
public class PropertyPostProcessorConfig { // 후처리기 생성하는 Config 클래스

    @Bean // 후처리기
    BeanPostProcessor propertyPostProcessor(Environment env) // Environment 환경설정 값 주입 받아서
    	{ return new BeanPostProcessor() { // 익명 클래스

        @Override
        public Object postProcessAfterInitialization(Object bean, String beanName) throws BeansException {
                // Bean Object 초기화가 끝난 다음에, 이 빈 오브젝트 프로세서를 실행해줘 !
                // <-> 이 후처리기는 모든 빈이 생성될때마다 각각 실행됨 !
            	// => Object : 생성된 빈

                MyConfigurationProperties annotation = AnnotationUtils.findAnnotation(bean.getClass(),MyConfigurationProperties.class);
                // 생성된 빈의 클래스에, MyConfigurationProperties가 붙은 애노테이션이 있으면 그 어노테이션을 반환해라
            	// return : 일치하는게 있으면 @MyConfigurationProperties 자체 반환

                if(annotation == null) return bean ; // 어노테이션이 없으면, 원래 하던대로 빈 생성

                return Binder.get(env).bindOrCreate("", bean.getClass());
            // 있으면? 값 세팅해야함 (여기선 아직 어노테이션 MyConfigurationProperties 자체는 안씀 그냥 값 있냐없냐)
            // : Environment에서 Property 값 가져와, bind를 시작했는데 없으면 Create해서 return
            }
        } ;
    }
}
=> ServerProperties 클래스 파일이 추가된다 하더라도 그에 맞춰 빈생성기 클래스를 따로 만들어줄 필요 없고
해당 프로퍼티 목록으로 클래스를 자동으로 만들어줌
- 그렇게 설정값이 세팅된 빈을 Tomcat은 Import
: 톰캣Config은 그 Property 값으로 세팅된 객체 주입받음
@MyAutoConfiguration
@ConditionalMyOnClass("org.apache.catalina.startup.Tomcat")
@Import(ServerProperties.class)
public class TomcatWebServerConfig {

    @Bean("tomcatWebServerFactory")
    @ConditionalOnMissingBean
    public ServletWebServerFactory servletWebServerFactory( /*Environment env */ ServerProperties properties){
        TomcatServletWebServerFactory factory =  new TomcatServletWebServerFactory(8081);

        factory.setContextPath(/*this.contextPath*/ properties.getContextPath());
        factory.setPort(/*port*/ properties.getPort());

        return factory ;
    }
}
5. prefix 붙이는 작업
Property 는 너무 많다… Property만 쓰면 자동구성정보에 등록된 클래스의 모든 환경 변수가 포함되는격
ㄴ 이름이 중복될 경우가 많음 ex) ‘port’ –> 어디의 ? 서버의?
- prefix : property들에 대한 namespace 역할 (패키지 같은 역할)
: binding(값 세팅) 을 할 때 그 prefix 를 추가해줘야함 ! - binding : server의 port !
; Environment에서 읽어온 프로퍼티값으로 port는 port인데 서버의 port 값을 세팅해줌 !
=> 실제로 server 폴더가 있는게 아니라 구분을 위해 달아준 prefix 타고가는거임
- @MyConfigurationProperties에 매개변수로 prefix를 입력받음
@MyConfigurationProperties(prefix="server")
public class ServerProperties {
    String contextPath;
    int port;

    public String getContextPath() {
        return contextPath;
    }

    public int getPort() {
        return port;
    }

    public void setContextPath(String contextPath) {
        this.contextPath = contextPath;
    }

    public void setPort(int port) {
        this.port = port;
    }
}
- MyConfigurationProperties
@Retention(RetentionPolicy.RUNTIME)
@Target(ElementType.TYPE)
@Component
public @interface MyConfigurationProperties {
    String prefix(); // server
}
- 해당 어노테이션이 붙은 빈 등록
- 후처리기 발동
: postProcessor에서 prefix를 뭐로했는지 알아서 binding을 할 때 그 prefix 를 추가해줘야함 !
@MyAutoConfiguration
public class PropertyPostProcessorConfig {

    @Bean
    BeanPostProcessor propertyPostProcessor(Environment env){
        return new BeanPostProcessor() { // 익명 클래스
            @Override
           public Object postProcessAfterInitialization(Object bean, String beanName) throws BeansException{
				// Object bean : ServerProperties

                MyConfigurationProperties annotation = AnnotationUtils.findAnnotation(bean.getClass(),MyConfigurationProperties.class);

                if(annotation == null) return bean ;

               // 반환된 어노테이션 MyConfigurationProperties의 모든 attr(매개변수 값)을 가져와 <이름, 객체>로 저장
               // <prefix, "server"> < ~ , ~ > ...
                Map<String,Object> attrs= AnnotationUtils.getAnnotationAttributes(annotation);
                String prefix = (String) attrs.get("prefix");

                return Binder.get(env).bindOrCreate(prefix, bean.getClass());
               //binding(값 세팅) 을 할 때 그 prefix 를 추가해줘야함 ! - binding : server의 port !
               // <-> Environment에서 읽어온 프로퍼티값으로 port는 port인데 서버의 port 값을 세팅해줌 !
              // (실제로 server 폴더가 있는게 아니라 구분을 위해 달아준 prefix 타고가는거임)

            }
        } ;
    }
}
6. 복습 : @Import(하드코딩)은 좋지 않다
-
자동구성정보 값 수정을 많이할 수록 하나의 클래스만 다루지 않음
=> 그에 맞게 프로퍼티 목록파일 xxProperties.java 파일도 많아질거임
=> 위와 같은 방식에선 그럼
@Import({ServerProperties.class, MyProperties.class, WaterProperties.class….} ) 로 쫙 나열해야함
=> 어딘가에서 수정할 프로퍼티 목록 읽어서 Import 동적으로 해줘야함 : selectImports()
- @Import –> @EnableMyConfigurationProperties
: 목적성을 분명히 함
@MyAutoConfiguration
@ConditionalMyOnClass("org.apache.catalina.startup.Tomcat")
// @Import(ServerProperties.class)
@EnableMyConfigurationProperties(ServerProperties.class , WaterProperties.class)
public class TomcatWebServerConfig {
- @Enable- 애노테이션의 대부분의 목적
: 이 안에 @Import을 다시 넣어 기능을 가진 Configuration 클래스나 Selector을 가져오는 목적
@Retention(RetentionPolicy.RUNTIME)
@Target(ElementType.TYPE)
@Import(MyConfigurationPropertiesImportSelector.class) // @Enable- 애노테이션의 대부분의 목적: 이 안에 @Import을 다시 넣어 기능을 가진 Configuration 클래스나 Selector을 가져오는 목적
public @interface EnableMyConfigurationProperties {
    Class<?> value(); // <ServerProperties.class , WaterProperties.class>
}
- ImportSelector 사용
public class MyConfigurationPropertiesImportSelector implements DeferredImportSelector {
    @Override
    public String[] selectImports(AnnotationMetadata importingClassMetadata) {

        MultiValueMap<String, Object> attr = importingClassMetadata.getAllAnnotationAttributes(EnableMyConfigurationProperties.class.getName());
        // EnableMyConfigurationProperties 이 애노테이션에 붙은 모든 애노테이션의 attribute를 가져와 Map 형태로 저장
//         => 이 Map:프로퍼티 클래스 이름들의 목록  <value, ServerProperties.class,WaterProperties.class >
        Class propertyClass = (Class) attr.getFirst("value");
        // 그냥 get은 List 형태로 반환되니 임의로 첫번째것만! - getFirst() -> ServerProperties.class

        return new String[]{propertyClass.getName()}; // ServerProperties.class
        // Import로 직접 ServerProperties 클래스를 가져오는 대신 @EnableMyConfigurationProperties의 element 값으로 프로퍼티값을 대신 읽어오도록 만듬
    }
}
- Inmemory(Embeded) DB –> H2 : 애플리케이션이 실행될때만 존재하는 DB
Test 순서
- HelloRepository test
- Helloervice TEst
댓글남기기